Showing posts with label Crafty Adventures. Show all posts

Thursday, 27 July 2017

Tie-Dying T-Shirts... And Hands

The fog finally lifted last week and we saw the sun. Little C and I took full advantage of the weather and spent a lot of time in the backyard playing. One day, we dug out a tie dying kit we had bought at Michaels a few weeks ago and got to work.

The kit we bought was made by Tulip a few weeks ago. It was a one step Tie Dye Kit. We used a 50% off coupon, so we got it for a pretty good price. They have many different sized kits. They even have one for a tie dye party! We chose one with 5 colours. 
After buying the kit, we headed to Walmart for some cheap t-shirts. We found some great plan white tees on the clearance rack. You don't have to buy new t-shirts thought. I remember tie dying everything I could find when I was a kit - white t-shirts, socks, underwear, anything! 

What I like about this kit is that it's easy. The instructions are easy to follow and there are lots to pictures to help.


Step 1 - Wash your items. You can tie dye dry fabric or wet fabric. I decided to go with the wet method. I think the dye is able to spread inward better, although I'm really not sure.

Step 2 - Tie up your fabric. There were lots of suggestions in the instructions that came with the kit, so I showed C the shirt and he chose a design to try.  This is what our shirts looked like after I had them all tied up with elastics. We tried to do a big bulls-eye, some smaller bulls-eyes, a swirl, a crumpled up ball, and some stripes. The best part of this project is that anything goes! You can't really mess it up... it may not look like the picture, but it will still look okay!


Step 3:  Now, take a deep breath, because it's time to get messy. The kit we bought came with these awesome squirt bottles. The dye was already in the bottles. I just had to fill them with water up to the line, put the cap back on and shake, shake, shake. Easy.

Step 4: start applying the dye. Here is my big piece of advice. Use the gloves. Actually, get yourself a better pair of gloves before you start. The gloves in the kit weren't the best. They didn't fit my hands well, and they definitely didn't fit C's. We started with gloves, but they were soon dropped on the grass. Big mistake. Dye really works. Even on skin. Ugh. (Over a week later, I'm still cleaning dye out of my nailbeds.)


Step 5: Wait. Wrap your clothing up, so the dye can do its job. I put each project in a ziplock bag to make sure that it didn't leak. 


Step 6:  The next day, take each item out and rinse out all the extra dye. There will be a lot. I was surprised, and sure that the shirts would be white when I was done. Luckily, they weren't! It did take a LOT of water to do this. 


Step 7:  Dry time!  I would suggest washing again, with items of similar colours. I have a feeling they will run for a couple of washes. 

This was definitely a fun project for outdoors. Grab your coupons, head to Michaels, and then search your closet for white t-shirts for some budget friendly fun!

Sunday, 21 May 2017

Chatbooks: Photo Books for Busy Folks

I used to love scrapbooking. Well, let's be honest. My scrapbooks were not those creative creations that some talented people make. I actually used to call my scrapbooks "fancy photo albums." Heavy on pictures, with some pretty paper and stickers. The photos were the showcase, not the layouts. 
The problem? I don't have time to scrapbook. I'm currently working on a scrapbook from my trip to Disney World, back in 2012. Yup, 5 years ago. 2012PC (Pre-Little C). I don't really have the space to lay things out, nor do I have the time, even though I love taking pictures, getting them printed and then putting them in albums. 
I do post pictures of my family adventures on Instagram and Facebook all the time. It's kind of become a digital photo album of sorts, but I like the idea of having a physical book on the shelf though. 


Cover of My Instragram book
- a frosty bedroom window
I recently found a solution! It's as easy as posting online, but you also get a book for the shelf! It's called Chatbooks. Have you heard of this? They offer different options, but the best is the ability to connect your Facebook or Instragram feed to your Chatbook account, so it automatically updates your Chatbook. You can choose your cover photo and include the date and caption from each post too. Then, you can open your Chatbooks app, make any changes to the order that you want, and exclude any pictures you don't want. This is great if you make business posts or post funny pictures you probably don't want in a family album. 

If you choose to do one of these linked series, once the book fills with 60 pictures, it will automatically charge your credit card and send it to you in the mail. 
The Spine:
My Instragrams
Vol.1:
Dec 2012-July 2014
Of course, I just set up my account a month ago, so I have LOTS of pictures I want in books. That's why I love the series option. I set my account up to send me one book a month from Instagram. These are hard covered books, which cost a few extra dollars. My first book arrived last month and my next one is on the way. I can't wait to have a cute little line of books on my shelf. 

I just set up my Facebook series and decided to opt for the softcover book, and have 5 books sent per month to catch up. They are now on the way. 

If you want to try Chatbooks, please use my link. You get a free book and I get a discount on my next book!  http://invite.chatbooks.com/tiffanysabin5h7 

Take a look inside my first Chatbook!


Tuesday, 21 February 2017

Snow Days Get Creative with a Wayfair Colouring Contest!

Winter hit us this week. All of winter... in one week. It's been horrible! There's so much snow, it's actually hard for Little C to play, because it's so deep. The drifts are way over his head, and our entire backyard is a drift. If Little C walked into the back yard, he would sink down, about 5 or 6 feet. It's hard to believe that a week ago our yard was bare grass. Mother Nature is playing a horrible game with us.

Needless to say, I've been on the hunt for fun activities to keep us entertained. There has been a lot of Play Doh, games, painting, cookie decorating (and eating!), reading, and singing. There has also been colouring... or maybe scribbling would be a more accurate term. Little C is more a free-spirit when it comes to art. Accuracy is not always a priority. 🙂

A couple days ago, I came across something that mixes two of my favourite things:
artsy fun AND contests!

Wayfair.ca has released a free downloadable colouring book, the WayZoo Colouring Book. It's great for kids (and probably adults!) of all ages. It features 10 scenes of animals around the home. To celebrate the launch, they're holding a contest, for a chance to win an art supply prize pack, which looks awesome! It includes an easel, chalk, markers, and paint. There will be five winners!


To enter, you submit a scanned copy or photograph of your child's favourite colouring page. The entries will be displayed on their website, so they'll get a little fame from their artwork!

There are only 6 days left in this contest, so make sure you download the WayZoo Colouring Book and start colouring today! Submit your picture to them by February 27th.

To go to WayFair's WayZoo Colouring Book page to read all the rules, get your colouring book, and get started, go here.

I submitted Little C's picture... do you think it's a winner? (It is in this mum's eyes... so it's going on my wall at work!)


Thursday, 5 January 2017

Finger Painting

Happiness is... watching a three year old finger paint. Especially when the three year old doesn't like getting his hands dirty, but realizes that he actually loves it!


Wednesday, 4 January 2017

Our Forgotten About Fall To Do List!

I was cleaning off the side of the fridge yesterday, and look what I found! It's my forgotten about Fall to Do List... which made me think of my semi-forgotten about blog. Let's face it, I'm no blogger, but I do like to post here from time to time, when I have spare time. Typically, that's summer, when I'm off work. I'm horrible at photo albums and scrapbooks, so this is a way for me to document some of my life happenings. Mostly happy times, sometimes things that are just living in my mind.

I checked more off my fall list than I thought I would, to be honest. This fall, I started a new job, C started back to preschool and we had a lot of meetings following his diagnosis of ASD. 

1.  Go apple picking - ✓ This year, we went to Charlotte's Family Orchard, in Gagetown. There were so many varieties of apples and lots of space to explore. C had a great time running around, picking apples (and eating about 10)! 
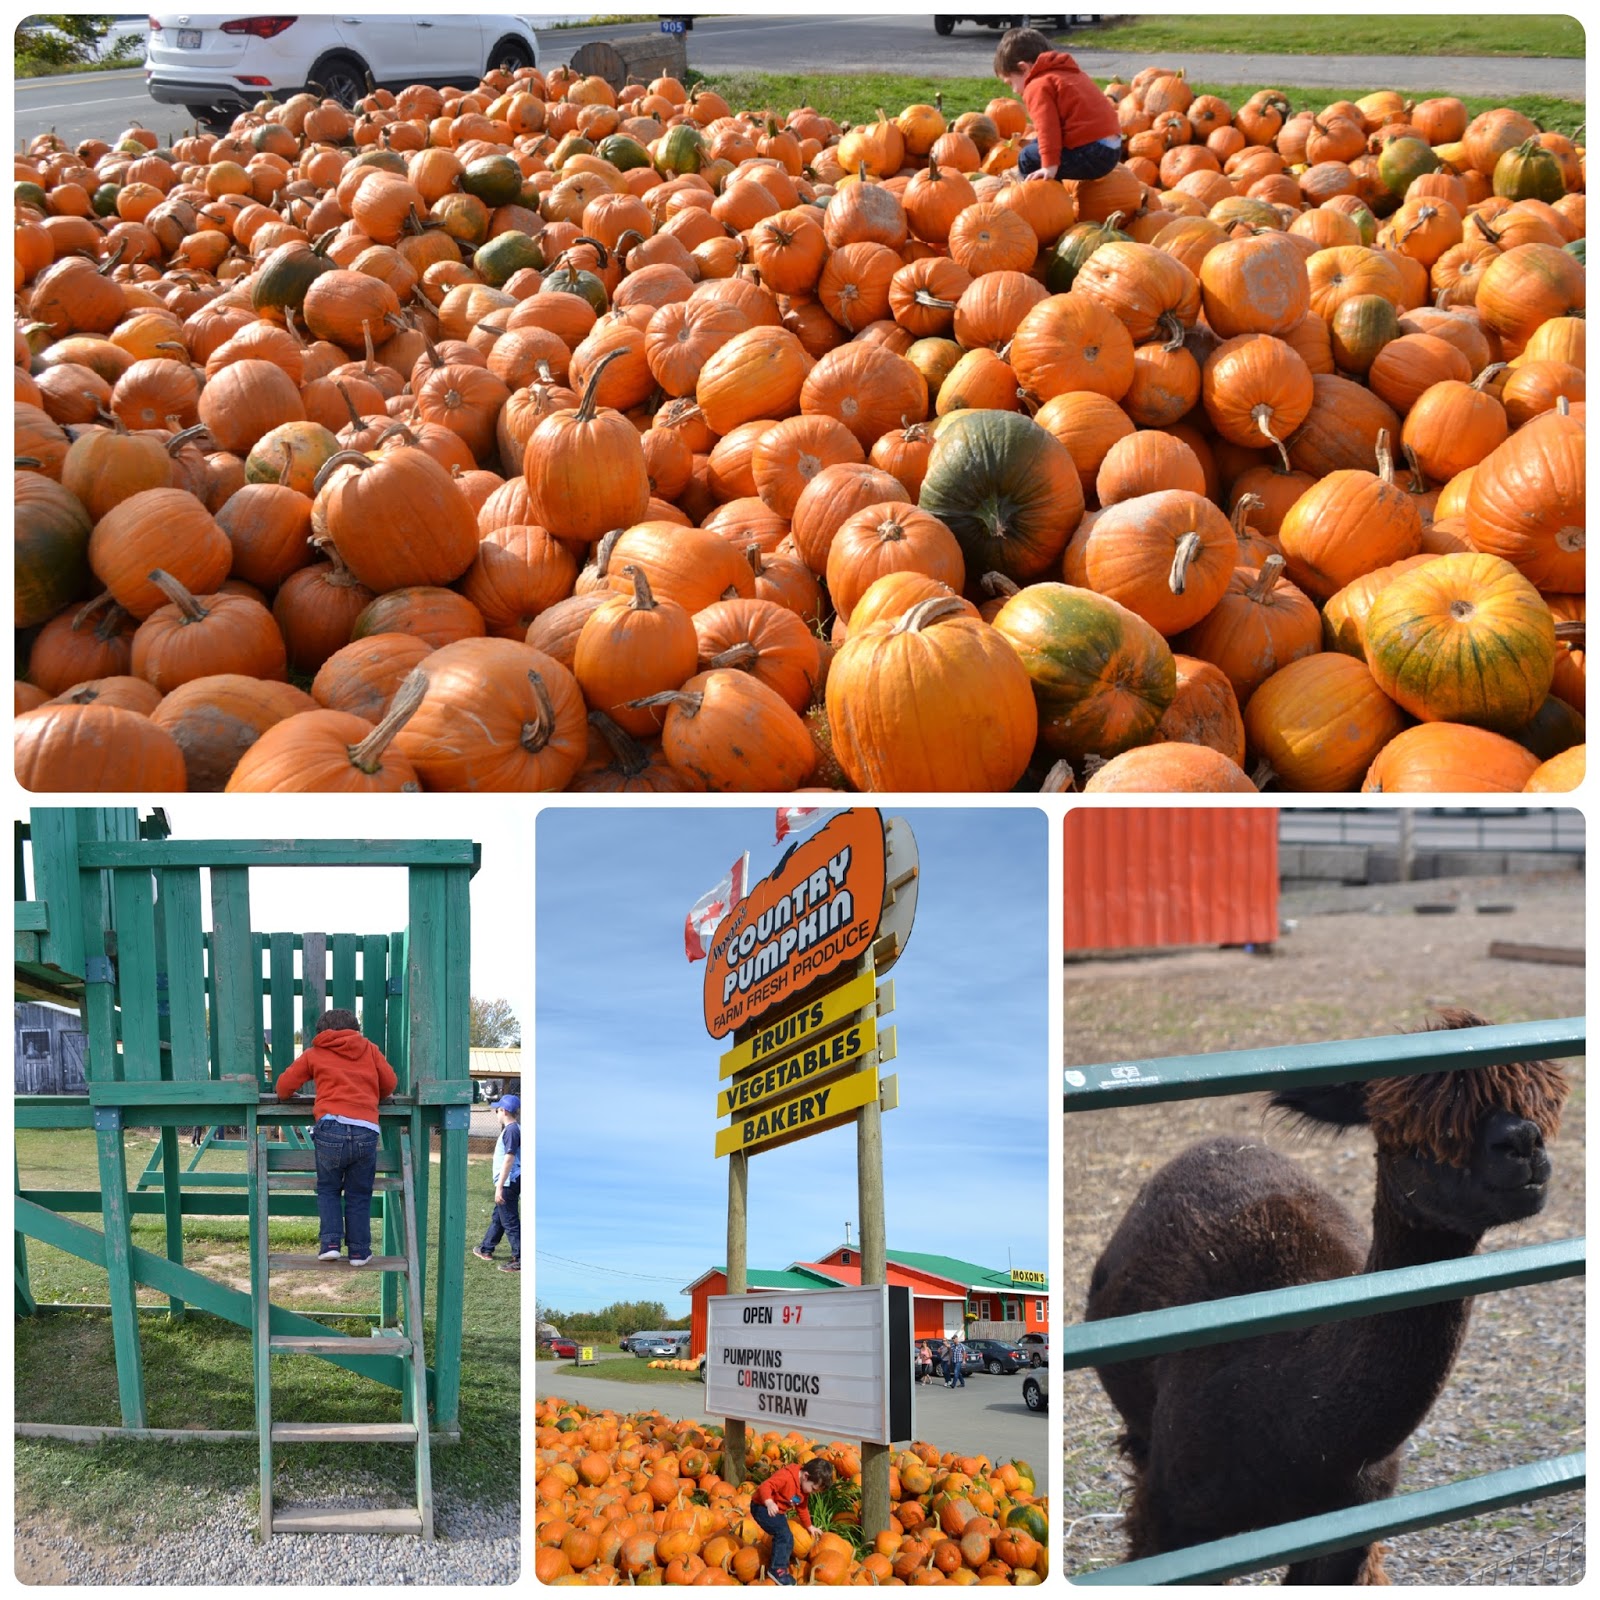
2.  Take a drive up to Fredericton, stopping at all the farm stands - ✓ It was a beautiful drive to the apple orchard, with all of the leaves popping with colour, so we decided to go even further toward Fredericton, to visit Moxon's Country Pumpkin. Besides being a farm and vegetable stand, they have the best bakery (C is all about their spoon bread!), and as a bonus for families, they have a small petting farm and playground. In the fall, they also have about a million pumpkins. Can you spot our little pumpkin in the pile? 

3.  Decorate our yard for fall - ✓  This is something my husband does every year. Corn stalks, straw bails, pumpkins. It's not extravagant, but Fall is our favourite season, so it really gets us into the season. 

4.  Carve pumpkins - ✓ C LOVED carving pumpkins. He did a lot of drawing on the pumpkins for me to carve and poking holes with the pumpkin knife. 


5.  Enjoy a walk in the park, to enjoy the fall colours - ✓ The leaves were beautiful this year. Any day we were able to to get outside to see them was a good day. 

5.  Make pickles - ✓ I did it! I made my two favourites, Chow Chow & Pickled Beets and then hubby and I made Apple Jelly. 

6.  Find a Halloween costume for C. - ✓ (but, also a total fail!)  We found a Halloween costume, but C refused to wear it. It was a really simple Thomas the Tank Engine costume, and he LOVES Thomas. He wouldn't have anything to do with it. Since he didn't want to wear a costume, we didn't go Trick or Treating, which made me sad, because Halloween is one of my favourite holidays and he had so much fun last year visiting a few of our neighbours. It ended up okay though, because he passed out treats to our Trick or Treaters. We had a TON! I think the final number was 220. That's a lot of work for a 3 year old! It ended up being a fun Halloween for everyone.

7.  Plan something special for C's 3rd birthday! - ✓ We had a nice family dinner for C's birthday. No kid party this year. Honestly, October was a very up and down month.  It was busy.  I couldn't figure out a good date and time for everyone, so I decided not to do it. I felt like a total mom failure, but many people reminded me that parties for little ones are usually for the benefit of the parents more than the kids. I still felt bad, but kind of agreed. 

8.  Jump in puddles - ✓ Many times! So much fun! I guess the upside of a very bumpy, uneven driveway has its benefits! 

9.  Get some fall candles from Bath & Body Works - ✓  Fall scents are the best scents. 

10.  Host Thanksgiving Day dinner! - ✓ I did it! This was a big one for me. I am not a "hostess," but I was pretty proud of pulling it off. It was a pretty good meal and C. made some cute centerpieces out of gourds. 

11.  Thanksgiving crafts! - ✓ This was fun! Gourds, paint, paint brushes, feathers, and anything else we could paint with. They turned out pretty cute. C was super proud of them and took good care of them, until the dog chewed one into pieces and C sat on another one and squished it. Then it was time to say, "Buh-bye gourds!" 
Thanksgiving crafts led to finger painting, which was a whole lot of fun too! This one is now in his art frame in the living room. 

The others didn't happen, but the worst fail of all would have to be:

*Sit back, relax, and breathe. <MAJOR FAIL!>  I can't remember a time when I felt more stressed than I was this fall. Work got the better of me. Home commitments got the better of me. Volunteer commitments got the better of me. It was bad. 

I was so happy that the Christmas break arrived. I have really allowed myself to take a break. Sleep, relaxation, and lots of play time with C. I think it's exactly what we all needed.

Saturday, 24 September 2016

Finally, Fall!

It's officially fall! My absolute favourite season. Cozy clothes, warm drinks, colourful leaves, crisp air. I love it all.

I've been working WAY too hard lately. In addition to the craziness of a new school year, with a new position, I have been doing some busy volunteer work and also decided to take on a little side project. Needless to say, it's been a bit crazy.  There hasn't been nearly enough fun in my life, so I thought I'd make a little list of things I would like to do this fall. Hopefully, I can figure out a way to make them all happen!

1.  Go apple picking
2.  Decorate our yard for fall
3.  Carve pumpkins
4.  Enjoy a walk in the park, to enjoy the fall colours
5.  Take a drive up to Fredericton, stopping at all the farm stands
6.  Make pickles
7.  Visit Kings Landing
8.  When September is over, make pumpkin cookies
9.  Find a Halloween costume for C.
10.  Plan something special for C's 3rd birthday!
11.  Jump in puddles
12.  Get some fall candles from Bath & Body Works
13.  Make some Halloween Crafts
14.  Take fun fall photos
15.  Host Thanksgiving Day dinner!
16.  Go to the Moncton Zoo
17.  Thanksgiving crafts!
18.  Fall Nature Hunt / I Spy Walk
19.  Make Applesauce
20.  Sit back, relax, and breathe.

Monday, 20 July 2015

My 1st Chalk Paint Project

I'm finished!

Bekvam Cart Makeover!

About 3 years ago, I purchased a Bekvam cart (from Ikea) for my teeny tiny kitchen. It's been sitting in my kitchen, unfinished, but well used, ever since. I had big plans, but it never happened, because I hated the idea of having to sand, prime, paint, and finish. That changed when I learned about Annie Sloan Chalk Paint. No sanding, no priming, just painting.

It really is that easy. I started this project last weekend. Despite not spending a lot of time on it, a week later, it's done! It was pretty easy.

I only ran into one problem. Since the cart had been used over the past three years, without any finish on it, there were a couple of stains that had sunk into the wood, on the top. When I put the first coat of paint on the top, I could see a stain showing through. At the class I attended last weekend, the instructor (and "stockist") explained that sometimes a coat of shellac is necessary to block stains or smells. I picked up a small container of it at Kent, added coat to the top, and I was good to go. Stains blocked.

3 coats of paint & 2 coats of wax
Top: Annie Sloan Cream
Bottom: Annie Sloan Aubusson Blue


I think it turned out great. I didn't do any distressing, because I wanted to test out the paint as is. It covers great, and the colour is gorgeous.

Next up, my Forhoja cart from Ikea! I think I'm going to try some light distressing on that cart. After some practice, I'm going to refinish my kitchen cabinets. (Eeeek!)

Monday, 13 July 2015

Crafty Adventures: Chalk Paint 101

On Saturday, I attended an Annie Sloan Chalk Paint workshop, at Suite Serendipity (in Saint John, NB), and I'm so glad that I did. I always see people refinishing furniture, and think it's a great way to affordably add new furniture to your home. I do not like the idea of having to sand, sand, sand before starting, and I've never had very good luck with painting. I always recoat too soon or paint on a humid day, so it always ends up sticky. And did I mention that I hate sanding. Ugh. When I first read about Annie Sloan paint, I liked the idea that you don't have to do any major sanding or stripping, that it dried quickly, and that there were no harsh fumes. (With a little boy in the house, that's really important.) I also like the folksy-rustic-shabby chic look, so I figured Chalk Paint was the thing for me.

I'm not going to get into a how-two, because there are so many of those out there, and if you're really interested, I suggest that you look for a workshop to learn from an expert, not a newbie.

In the workshop, we learned about the paint and got to use it to try out different techniques and colours:

The four basic finishes, clockwise, starting with the green:
Smooth Finish, Two Colour Wash, Two-Coloured Distressed, & Rustic Finish

Without getting into the technical details, here are a few things I learned:

1)  Chalk Paint is called Chalk Paint not because it's chalkboard paint; it's due to its matte, chalky  finish. I'm sure you could write on it with chalk, but that's not the best part. "Chalk Paint" is the trademarked name specifically for Annie Sloan paint.  All other "chalk paints" are imposters!

2)  Annie Sloan is a real person! Apparently, in the DIY up-cycle world, she's a total rock star. I'm not judging though, because I'm sure that after I watch some of her online videos, I'll feel the same.

3)  Chalk paint can be used on pretty much anything - wood, metal, plastic, glass - even upholstery.

4)   People who sell chalk paint are called "stockists." To earn the fun title, they are hand-picked to be trained as stockists. I love that Annie Sloan products are only sold in independent stores, so it's a great support for small, local businesses.  The training they receive makes them a perfect go-to resource to help with trouble shooting, or to learn how to use the paint. I think most offer workshops. I'll be watching for more workshops in the future.

5)  ASCP (Annie Sloan Chalk Paint) can give you a finish that is as rustic/shabby as you want. I worried that everything would turn out looking "dirty." I'm all for a rustic look, but I don't like my furniture to look TOO shabby.  There are four basic finishes - some are distressed, while others aren't. You can create that darker vintage "dirty" look with dark wax, but you don't have to use dark wax, and if you do, you don't have to use  a lot of it.  Overall, Annie Sloan products are pretty versatile.


I'm now working on my first project:

I've had this cart from Ikea in my kitchen for about 3 years, and I never did anything with it. Because it's unfinished, it has some staining on the top, from spills. I'm not sure how it will turn out, but I'm excited to get started!

If you want more information on Chalk Paint, I suggest checking out: https://www.facebook.com/suiteserendipity or http://suiteserendipity.com/ . Of course, as with all things in life, Pinterest is a great place to look, too! I've started pinning already!

Tuesday, 15 July 2014

Sewing: A New Obsession!

In March, I took a three week sewing class.  It’s been something I’ve wanted to learn for many years, but never seemed to make time for.  I loved Home Ec. class in Junior High, when we got to learn cooking and sewing.  When I saw that an adult sewing class was being offered at a local children’s sewing school, I decided that it was my chance.  It was also a “get Mommy out of the house” project.  A chance for me to do something other than take care of my son, which had pretty much been my life 100% of the time for the past 5 months.  I certainly love that, but I knew I needed to learn how to be away from him, and he needed to be okay being away from me. 
Brother CS6000-i
Since taking the class, I bargain shopped for a sewing machine and have enjoyed practicing and learning new techniques.  My first project, for the class, was a pair of pyjama pants. They didn’t fit me well and had to be shortened into capris because they were too short for me.  Flattering, they were not!  To top it off, they fell apart after wearing them a couple of times. I’d say that project was a total fail. Luckily, I’ve had some successful projects since then. 


My second project in the class was a purse.  I use it all the time as a mini diaper bag. I love the material. 


At the same time, I made a pillowcase.  Now that I see the picture again, I think I need to make some more of these.  It was a super easy project that gave me a chance to learn about my sewing machine.  I made it a little too long, but since I guessed what measurements to use, I think it turned out pretty good.  Plus, the pillow doesn't inch its way out, because it's extra long.


My first big solo project was a fun one.  We were going to a birthday party and the theme was a princess party.  Since it was April, it was hard to find a costume for a baby, so I thought I’d make one.  It was a challenge! I made a pattern, by tracing the outline of one of his onsies and designed a tunic based on that sizing. Then, I looked on Pinterest for some ideas.  It was really fun to make and I was able to learn some new techniques to create the tunic, belt, and crown.  I think Little C had fun wearing it too. He was all smiles when he had it on. Hopefully, I’ll be able to make his Halloween costume for him this fall.


Since then, I’ve been making a lot of baby stuff.  I thought sewing would be a nice way to make personal gifts, and a way to make some fun things for my son.  They’re also small projects, which give me the chance to practice, and I can do them during nap time.  Here are some of the projects I’ve made:

taggy blankets, soother/toy tether, bandana bibs, stroller lap blanket
My absolute favourite baby project is the bandana "dribble" bib.  I've made a ton of these! I found the pattern on Pinterest and love it.  Instead of having a snap or Velcro to attach the ends, it uses a single button hole on one side, which you pull the other side through.  It’s really easy to remove, and there aren't any scratches from Velcro, which has been a problem for my son. They're great for teething babies! Here is the link to the pattern: http://leafytreetopspot.blogspot.ca/2014/02/free-pattern-and-tutorial-baby-dribble.html

back of the bandana bib
 
My big sewing goal is to make a quilt. Any quilt would do, but I saw a quilt on Pinterest made of outgrown onsies. It was kind of one of those crazy quilts – random size pieces, no real order, fun stitches. I loved it, and thought it would give me an excuse to keep some of Little C’s outfits.  I had recently packed some of his outgrown baby clothes away, and it was a major boo-hoo task.  (Why is it so hard to pack away outgrown baby clothes? It’s not like I want him to stay a baby forever... although it would be nice if he could stay little for just a little longer though...)

To start practicing for a baby outfit quilt, I’ve been working on a simple quilt.  I found a pattern on Pinterest (here is the link: http://neverenoughhours.blogspot.ca/2010/08/fat-quarter-baby-quilt-tutorial.html) and have been working on it on and off.  There's good and bad to this quilt.  The good? It's been fun and I've been learning lots. It has also been a budget quilt, so a great one to start with, in case I mess it up! It's made of fat quarters, which I was able to get really cheap.  I am using a piece of leftover flannel for batting, and got a piece of fun fabric for backing at a good sale.  It is probably costing less than $15.  The bad? I've got a lot to learn! Sometimes have no idea what to do. When I start to get stuck or frustrated, I take a break. Currently, I’m at the quilting stage and on a break. I feel like it’s turned out pretty well up to this point, and I really don’t want to mess it up.  It’s a bit scary.  Because I have zero hand sewing skills, I’m trying machine quilting.  My hope is to eventually try some hand sewing, but not yet.  This is what it looked like when I made my “quilt sandwich” with the top, batting (I used a piece of flannel), and backing. It doesn't look like much now, but hopefully (fingers crossed!) it will come together soon.

 
So there are the highlights of about four months of sewing adventures.  I feel like I’ve accomplished quite a bit, considering I have a baby to take care of. I still have a lot to learn! I’m always looking for new ideas (thank you, Pinterest!) and will continue to work at getting better!

Thursday, 10 July 2014

My Favourite Pinterest Adventures

I love Pinterest.  Well, I have a bit of a love-hate thing going on with Pinterest. I love all the ideas, and it’s my go-to place online, when I’m looking for something new to make, but I hate that it’s such a time suck.  Luckily I have a baby to take care of now, so I only get to go on Pinterest in two to three minute bursts now, but towards the end of my pregnancy, I would waste an entire afternoon.

I really only pin within three categories:

Food: In general, I’m a fan of food.  I’ve mentioned before that I love cooking and like trying new things.  I’m always looking for new recipes, because I get bored easily.  I use Pinterest more than my recipe books now.  I like that there is always a picture, which isn’t always the case with a book. 

Home/Organization:  My house is also always in reno-mode, so I’m always looking for ideas.  I live in a post-WWII one and a half storey homes.  Many cities and towns have neighbourhoods like mine – filled with one or two versions of the same house built around 1950.  I’m always looking for ways to make my house feel a little different than others that I walk into. I should also mention that my house is SMALL! Small is good – less cleaning, more cozy, less to take care of, but in this case, small also means no practical storage. Despite being here for over 5 years, my dream of having a well organized house, where everything has a home, has not yet been achieved. And so I “pin” for inspiration.  Sometimes my pins even become reality!

DIY/Crafting: I want to be one of those super-crafty creative people.  I’m really not. All I end up with is glue gun burns, paint on my clothes, and a big mess to clean up.  I dabble in scrapbooking, but that’s about where my craftyness ends – cutting and gluing.  All of those “Pinterest Fail”/“Nailed It!” pictures floating around the internet crack me up, because I could have taken any of them, I’m sure.

I already shared some of the baking successes I’ve have, so I thought I’d share a couple of Pinterest inspired house projects I’ve had completed or are currently working on. 

1) User Manual Binders –


My Version:
This may not be the most exciting project, but it has helped keep one thing in my life in order – manuals.  Ugh. I hate them.  They used to be all over my house.  You never knew where you’d find them.  The snowblower manual was in the kitchen. The stove manual was in the living room. The TV manual was in the basement.  The washing machine manual was in the spare room.  There was no rhyme or reason to where a manual was.  The problem? They didn’t have a home.  Now they do! I had found a pin that suggested that I use binders and page protector sheets.  Each manual gets its own page protector and they all get put in the binder.  When I need a manual, I just look in my binder! Sometimes, when I’ve been REALLY organized, I’ve even put the receipt with the manual. 

 
2) My Super Simple Recipe Binder –

Original Pin: There wasn't really ONE pin... I had found some ideas for storing recipes, and made this one my own.

My Version:
It’s great to have Pinterest, but you have to remember that the Internet is always changing. Just because something is there today, doesn’t mean it will be there tomorrow.  When I find a recipe I like, I always try to print it off. Of course, then it just gets bounced around from place to place until it eventually makes its way to the garbage or some random pile of papers.  One day, I sat down and made a Super Simple Recipe Binder, after looking at some examples on Pinterest.  Now, I have a place to put the recipes I’ve tried.  I can also keep note of changes I’ve made to the recipes, nutritional information, etc. I also made dividers to help organize my recipes - appetizers, soup, chicken, pasta, etc. Like the manual binder, it’s just a binder and page protectors.  Super cheap, super easy. It’s brilliant though, because if you’re a messy cook (like I am) the page protectors help keep your recipe clean as well as organized.  Also, if you print the recipe from a website, it will remind you where the recipe came from, in case you want to go back and look for more!!
Notice the Chocolate Cake recipe from a previous post?  Yummy!
3) My Happy Jar –

Original Pin: http://media-cache-ak0.pinimg.com/600x/16/4e/f9/164ef96947bce17aed08b3a775428aa3.jpg (I guess this is just a picture, but it’s pretty self-explanatory)

My Version:
I love my Happy Jar.  I found this idea around Christmas time. I had had a baby two months before, the dark cold winter months were starting, and even though I was really happy, I was feeling a bit overwhelmed with my new normal. First time mums have a lot to learn.  I felt like we were finally settling in to a routine, and wanted to make sure that I was focusing on the good things in life, so I wouldn’t slip into a really bad case of the winter blues. This idea was perfect, and again, SO EASY! It’s kind of like a year-long time capsule or a different version of a scrapbook. All you need is paper, a pen and some sort of jar/bucket/vase.  Just keep a jar on a shelf and throughout the year, throw in LOLs, memorable moments, C’s firsts, funny things, basically anything that would be a good thing look back on.  On New Years Day 2015, we’ll open up the jar, think back on 2014 with a smile and then start all over again.  To help make sure it was easy to add to, I cut up little pieces of colourful paper (so the jar looks colourful as it gets filled up) and put them in a box next to the jar and always keep a pen or two in the jar, so everything is right there, ready to go. The hardest part is not allowing myself to going into the jar to reread notes I’ve put in!

 
4) M&M Garden Stones -


My Version:
This is actually from a buzzfeed list (which I then pinned.)  As soon as I saw the picture of the M&M garden stones, I knew I needed to make them for a family member who loves all things M&M. They look super cute and were fun to make.  I bought outdoor craft paint and collected a few M&M shaped rocks at the beach.  Each rock was painted with coats of M&M coloured paint.  Then I made a stencil of the “M,” traced it on the rock with a pencil and painted it with white paint. My original plan was to spray it with some sort of shellac, but since I bought outdoor paint, I skipped that step.  They turned out great! Also, since they were a gift from my son, I got him to “sign” the back, but putting a handprint on one and little thumbprints on the others.  They were a bit messy, because he was 7 months old, but still little and cute. (Plus, that side will be facing the ground!)   


Those are my favourite projects, but I’ve got some other Pinterest-inspired projects on the go, so I’ll keep you updated!

Do you have a favourite Pinterest-Inspired Project you've made?

Blueberry Pie and A Beautiful Drive!

Yesterday, I went for a drive all by myself. I feel like this shouldn't be news, but usually I have C in tow, and although he makes road...