I have a love-hate relationship with Pinterest. It can be a major time suck, but it can also be so helpful! I pin ideas for school, home renos, and organization, but most often it's recipes. Pinterest is like a modern day recipe box. Of course, I've pinned many recipes that I haven't tried (and probably never will,) but I have managed to find some favourites. I thought I'd share some of them here. I've tried all of these recipes, often more than once, and recommend them. I can't say that I followed the recipes exactly the way they are written
1. Loaded Philly Cheesesteak Baked Potato - from Skinnytaste.com
Try it. Seriously. It was delicious. It's on the menu plan for this week, but I think we'll just serve it on some crusty rolls instead of potatoes.
2. My Favorite Chewy Chocolate Chip Cookies - from The Spiffy Cookie
These cookies take a long time to make, but the time is so worth it! They were crowned the chocolate chip cookie winner by my husband.
3. Homemade Pizza Dough - from Favorite Family Recipes
This is my go-to pizza dough recipe. It freezes well and makes a good pizza!
4. Oreo Ultimate Turtles Cheesecake - from Allrecipes.com
You definitely want to make this when people are coming over or if you need dessert to bring to a potluck. You don't want to be forced to eat it all. Trust me. It's really sweet. I have a pretty rich sweet tooth, and this cheesecake puts it to the test. This is definitely are "share with lots of people" recipe.
5. The Best Chocolate Cake Recipe - from Add A Pinch
This is my favourite chocolate cake recipe. I've talked about it before (here and here). The espresso powder in the recipe makes it something special! Don't skip it. Just trust me. Now I want chocolate cake!
6. Best Meatloaf. Ever. from South Your Mouth
Okay, I'm not exactly a meatloaf girl. I had visions of dried out ketchup covered ground beef. I'm telling you, this recipe is actually good. Give it a try.
7. Rice Krispie Cookies from C and C Dish
These cookies remind me of the ones my grandmother used to make. Everyong called my grandmother Cookie Nan, and with a name like that, you know that she was known for her cookies! I sadly don't have any of her cookie recipes, but these are close. Every time I make these delicious treats, I think of her.
8. Olive Garden Pasta e Fagioli Soup from Farm Girl in the Suburbs
I have been to Olive Garden three times in my life. The first time I went, I had this soup. This recipe isn't quite what I remember from the restaurant, but it is really good. I find it's a bit think, so don't expect it to be very soupy; it's more like a chili consistency. It freezes well, and that's always a bonus for work lunch planning.
9. Pepperoni Pizza Quesadillas - from Snixy Kitchen
I love pizza. I also like quesadillas. I never would have thought to put them together. It's a quick lunchtime meal.
10. Turkey, Veggie Tray, & Barley Soup {Thanksgiving Leftover Recipe} from The Chic Life
I have only made this once, and had completely forgotten about this recipe, but I do remember that it was delicious. I love a good soup recipe and this one is awesome! It's also easy to change up depending on what you have in your fridge.
I've got some new Pinterest recipes to try this week in our weekly meal plan, and I'm excited to see if I can find any keepers for quick and easy weeknight meals. Have you found any go-to everyday recipes? Comment below and let me know!
Showing posts with label Recipes. Show all posts
Showing posts with label Recipes. Show all posts
Friday, 21 August 2015

Monday, 17 August 2015
Quick and Easy Chili
I love chili and often make it in my slow cooker. Sadly, a slow cooker is slow. Last week, I really wanted some homemade chili. It was a rainy, foggy day, and chili just seemed like a good choice. The problem? It was 4pm. I couldn't really break out the slow cooker and expect it to be ready for 5:30. I had hamburger thawed in the fridge, some beans and tomatoes in the pantry, so I decided to freehand it for some stovetop chili! This is what I came up with:

Serve it solo, in a bowl as it is, or with chips, sour cream, and/or cheese! Yummy comfort food!
It turned out pretty well, and I figured that it would be even better the next day, but sadly, my fuzzy mom-brain prevented that from happening, because I forgot to put it in the fridge overnight! I was one sad mama as I poured it into the compost bag. Next time, I need to remember to portion it out in containers and put it in the freezer right away!
What I love about a simple recipe is that it's easily changed up. Have some leftover corn from last night's corn boil? Throw it in! Tomatoes that didn't get used for your salad? Dice 'em up and toss them in!
Any suggestions on how to make this quick recipe better? I'd love to hear them, especially if you have any ideas on other vegetables to add in!
Quick & Easy Chili:
- 2t oil
- 1lb of ground beef (a 1/2 lb would work if you want to cut down on the meat... Or use a mix of different ground meats-Turkey, sausage, beef... The options are endless!)
- 2 packages of mushrooms - sliced, diced, or chopped - use more or less, to your own preference
- 1 onion, diced
- garlic - a clove or two, diced
- bell pepper, chopped - any kind and as much as you want. (I used half an orange pepper)
- 1 can of diced tomatoes
- 1 can of crushed tomatoes (you could use two cans of diced, if you prefer)
- 1 can of kidney beans, drained and rinsed to get rid of the bean "sauce"
- 2T chili powder (or more or less, your choice)
- 1t cumin
- 1/2C or so of your favourite salsa - optional, but I find it adds some quick flavour!
- salt & pepper, to taste
Directions:
1. Add a little oil to a good sized pot and heat, then add ground beef, breaking it up as it cooks. (While it is cooking, cut up mushrooms, onion, garlic, and pepper.)
2. Once no longer pink, drain fat from ground beef, and add onion, garlic, and mushrooms. Cook until mushrooms have released liquid and it has evaporated a bit. (I love mushrooms, but hate it when mushroom juice waters down my food!) Add peppers and cook for a couple more minutes. If you want them crunchy, don't good for too long.
3. Add tomatoes (diced and crushed), beans, spices. Heat until it's simmering and reduce heat.
4. After about 10 minutes, taste and make adjustments to spices, if needed.
5. Simmer for another 10 minutes, and you're good to go!
Serve it solo, in a bowl as it is, or with chips, sour cream, and/or cheese! Yummy comfort food!
- - -
It turned out pretty well, and I figured that it would be even better the next day, but sadly, my fuzzy mom-brain prevented that from happening, because I forgot to put it in the fridge overnight! I was one sad mama as I poured it into the compost bag. Next time, I need to remember to portion it out in containers and put it in the freezer right away!
What I love about a simple recipe is that it's easily changed up. Have some leftover corn from last night's corn boil? Throw it in! Tomatoes that didn't get used for your salad? Dice 'em up and toss them in!
Any suggestions on how to make this quick recipe better? I'd love to hear them, especially if you have any ideas on other vegetables to add in!
Tuesday, 28 July 2015
Grilled Cows Cheese Sandwich with Mushrooms
We're heading to PEI next month, and today, I had a treat for lunch straight from the Island. A delicious grilled cheese sandwich made with Cow's cheese! It was so yummy.
Cow's cheese has a pretty high milk fat content, and can be a bit pricey, so I don't buy it often, but it's SOOOO good! Luckily, I don't have to be in PEI to get it, as Sobeys and Costco often carry it. Every so often, I pick up a chunk and use it in grilled cheeses (is cheeses a real word??), diced up in salads, grated on pasta, or just as a snack on its own.
A couple years ago, I had been at Sobeys and a booth was offering samples of grilled cheese with mushrooms. I had never added anything to my grilled cheese before, and realized that I had been missing out! Since then, I've made grilled cheese sandwiches with sautéed mushrooms and Cows cheese as a special lunch time treat.

Ingredients:
2 slices of multigrain bread
Sliced cows cheese (enough to cover a piece of bread) - not too thick, it's rich
Mushrooms sliced thinly - probably about 2-3 mushrooms, any type
1t or so of butter or margarine
Directions:
1. Preheat frying pan and sauté mushrooms until water is released. You don't want that moisture in your sandwich!
2. Build your sandwich - butter/margarine one side of each piece of bread, place enough sliced cheese to cover a non-buttered side of the bread, add saluted onions on top of cheese, topped with the second piece of bread (buttered side facing out, of course).
3. Carefully flop into a preheated frying pan, and watch carefully, making sure it doesn't burn, flipping after the first side gets golden brown.
4. Slice in two and enjoy! Serve with some veggie sticks.

Cow's cheese has a pretty high milk fat content, and can be a bit pricey, so I don't buy it often, but it's SOOOO good! Luckily, I don't have to be in PEI to get it, as Sobeys and Costco often carry it. Every so often, I pick up a chunk and use it in grilled cheeses (is cheeses a real word??), diced up in salads, grated on pasta, or just as a snack on its own.
A couple years ago, I had been at Sobeys and a booth was offering samples of grilled cheese with mushrooms. I had never added anything to my grilled cheese before, and realized that I had been missing out! Since then, I've made grilled cheese sandwiches with sautéed mushrooms and Cows cheese as a special lunch time treat.
Grilled Cows Cheese with Mushrooms Sandwich

Ingredients:
2 slices of multigrain bread
Sliced cows cheese (enough to cover a piece of bread) - not too thick, it's rich
Mushrooms sliced thinly - probably about 2-3 mushrooms, any type
1t or so of butter or margarine
Directions:
1. Preheat frying pan and sauté mushrooms until water is released. You don't want that moisture in your sandwich!
2. Build your sandwich - butter/margarine one side of each piece of bread, place enough sliced cheese to cover a non-buttered side of the bread, add saluted onions on top of cheese, topped with the second piece of bread (buttered side facing out, of course).
3. Carefully flop into a preheated frying pan, and watch carefully, making sure it doesn't burn, flipping after the first side gets golden brown.
4. Slice in two and enjoy! Serve with some veggie sticks.

Monday, 27 July 2015
Kitchen Adventures: Seafood Chowder
In my house, we love a good maritime treat.. Any seafood will do, but chowder is a favourite. It's so rich that we usually only make it once a year. Usually, it's at Christmas time, with leftover lobster from our Christmas Eve lobster. This year, my husband requested it for his birthday.
I like to share recipes, but often make things up as I go along. This is especially true with seafood chowder, and that's what makes it fun. This time, I thought I would write down what I do, so I can duplicate it or make more calculated improvements over time.
I should warn you that this recipe is for a crowd. It would probably feed about 20. We needed to feed 10. Many had seconds, and we have lots of leftovers. I have issues with size control when cooking. If you are looking for a smaller recipe, scroll to the bottom of the recipe, as I've cut it in half, for a smaller crowd.

Ingredients:
1/2 C Butter
3-4 small-medium onions, diced
6 celery stalks, diced
3-4 carrots, diced
4 baking potatoes, diced
2 baking potatoes, grated
5 bay leaves
3t thyme
3t dill
1/2t cayenne pepper
1/2t paprika
2L (8C) Cream - I use coffee cream, which is 18%, but you could go as rich as you want.
2-3L (8-10C) Milk - whole
4 Cans of clams and juice
5-6 lbs of seafood the following (or any other mix of seafood)
-Scallops (if large, cut in half of thirds)
-Shrimp (raw, peeled, and deveined )
-Lobster (cut into chunks)
-Salmon (chunked)
-Haddock (chunked)
Salt & Pepper, to taste
Directions:
1. In a stock pot, melt butter over medium-high heat, and add onions, celery, and carrots. Cook, until veggies are starting to cook. It will smell heavenly.
2. Add potatoes (diced and grated), spices (alter to suit your tastes), clams and juices, and 1L of cream and 1L of milk. Heat over medium until it starts to bubble a bit, but DON'T BOIL! There is dairy in that pot, and you don't want it to turn and curdle.
3. Turn down the heat and let it simmer for about 45 minutes, or until the grated potatoes have broken down and the diced potatoes are getting tender. Make sure you stir a lot.
4. Add the rest of the seafood, including any juice - especially the lobster juice! - and then enough cream and milk to ensure there is a good amount of broth. I added about 1.5L of milk and 1L of cream.
5. Turn up the heat a bit and let it warm through. Stir, stir, stir. That's key. If you want a really rich treat, add some more butter, cubed, and start stirring. I don't think it's necessary, but I know people that swear by it! Once everything is in the pot and heated, it's time to taste and adjust. Taste the broth and adjust the spices. I added a little extra dill, some pepper and a little salt.
I encourage you to make the recipe your own - try different spices, seafood, veggies, etc. Try a different ratio of cream to milk, or cut out the cream altogether, to save some calories and fat. Whatever you do, let me know! Then, I can try it for myself. Leave a comment, and share your chowder tips!
Note:
Since you won't always have a crowd, here is an ingredients list for a half recipe. It's still heavy on the seafood. You could easily cut this in half again.
1/4 C Butter
2 small-medium onions, diced
3 celery stalks, diced
2 carrots, diced
2 baking potatoes, diced
1 baking potatoes, grated
3 bay leaves
1.5t thyme
1.5t dill
1/4t cayenne pepper
1/4t paprika
1L (4C) Cream - 35%, or a mix (1/2 L for step 2, and the rest for step 4)
1-2L (4-8C) Milk - whole (1/2 L for step 2, and the rest for step 4)
2 Cans of clams and juice
3 lbs of seafood like the following (or any other mix of seafood)
- Scallops, Shrimp, Lobster, Salmon, Haddock
Salt & Pepper
I like to share recipes, but often make things up as I go along. This is especially true with seafood chowder, and that's what makes it fun. This time, I thought I would write down what I do, so I can duplicate it or make more calculated improvements over time.
I should warn you that this recipe is for a crowd. It would probably feed about 20. We needed to feed 10. Many had seconds, and we have lots of leftovers. I have issues with size control when cooking. If you are looking for a smaller recipe, scroll to the bottom of the recipe, as I've cut it in half, for a smaller crowd.
Maritime Seafood Chowder

(Serves a crowd!)
Ingredients:
1/2 C Butter
3-4 small-medium onions, diced
6 celery stalks, diced
3-4 carrots, diced
4 baking potatoes, diced
2 baking potatoes, grated
5 bay leaves
3t thyme
3t dill
1/2t cayenne pepper
1/2t paprika
2L (8C) Cream - I use coffee cream, which is 18%, but you could go as rich as you want.
2-3L (8-10C) Milk - whole
4 Cans of clams and juice
5-6 lbs of seafood the following (or any other mix of seafood)
-Scallops (if large, cut in half of thirds)
-Shrimp (raw, peeled, and deveined )
-Lobster (cut into chunks)
-Salmon (chunked)
-Haddock (chunked)
Salt & Pepper, to taste
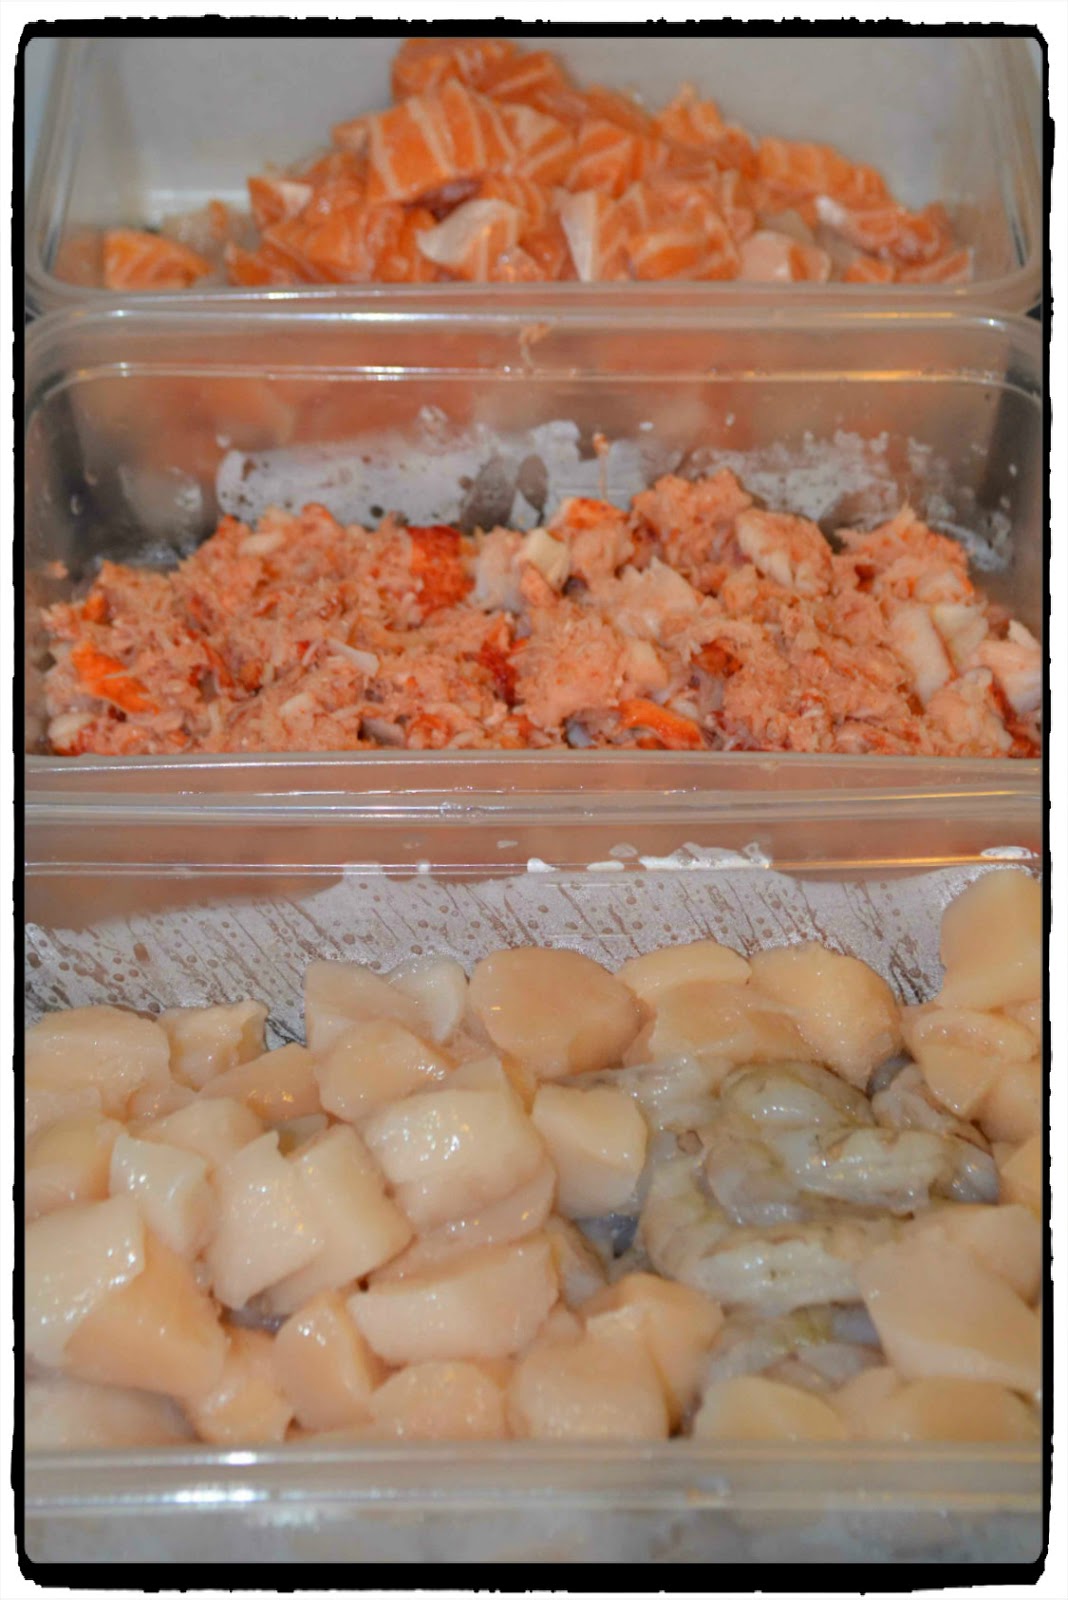 |
| Salmon, Haddock, Lobster, Scallops and Shrimp, waiting to be added to the pot. |
Directions:
1. In a stock pot, melt butter over medium-high heat, and add onions, celery, and carrots. Cook, until veggies are starting to cook. It will smell heavenly.
2. Add potatoes (diced and grated), spices (alter to suit your tastes), clams and juices, and 1L of cream and 1L of milk. Heat over medium until it starts to bubble a bit, but DON'T BOIL! There is dairy in that pot, and you don't want it to turn and curdle.
3. Turn down the heat and let it simmer for about 45 minutes, or until the grated potatoes have broken down and the diced potatoes are getting tender. Make sure you stir a lot.
4. Add the rest of the seafood, including any juice - especially the lobster juice! - and then enough cream and milk to ensure there is a good amount of broth. I added about 1.5L of milk and 1L of cream.
5. Turn up the heat a bit and let it warm through. Stir, stir, stir. That's key. If you want a really rich treat, add some more butter, cubed, and start stirring. I don't think it's necessary, but I know people that swear by it! Once everything is in the pot and heated, it's time to taste and adjust. Taste the broth and adjust the spices. I added a little extra dill, some pepper and a little salt.
I encourage you to make the recipe your own - try different spices, seafood, veggies, etc. Try a different ratio of cream to milk, or cut out the cream altogether, to save some calories and fat. Whatever you do, let me know! Then, I can try it for myself. Leave a comment, and share your chowder tips!
Note:
Since you won't always have a crowd, here is an ingredients list for a half recipe. It's still heavy on the seafood. You could easily cut this in half again.
1/4 C Butter
2 small-medium onions, diced
3 celery stalks, diced
2 carrots, diced
2 baking potatoes, diced
1 baking potatoes, grated
3 bay leaves
1.5t thyme
1.5t dill
1/4t cayenne pepper
1/4t paprika
1L (4C) Cream - 35%, or a mix (1/2 L for step 2, and the rest for step 4)
1-2L (4-8C) Milk - whole (1/2 L for step 2, and the rest for step 4)
2 Cans of clams and juice
3 lbs of seafood like the following (or any other mix of seafood)
- Scallops, Shrimp, Lobster, Salmon, Haddock
Salt & Pepper
Wednesday, 13 August 2014
Blend & Extend! Tomato Hamburger Macaroni
I tried it again! I blended & extended one of my go-to recipes. Blend and Extend is a concept that Ontario Beef and Mushroom Canada is promoting. I had seen it and thought it was a great idea. I few weeks ago, I made my own version of their taco salad recipe. Last week, I was making a batch of Macaroni with Tomatoes and Hamburger for the freezer. I thought it would be perfect for the Blend and Extend idea, so I gave it a try. It's a great way to add extra vegetables, cut back on the amount of meat you're consuming (because it's often too much!) and keep the same taste, or even make it better!
As a bonus, this is probably my son's new favourite food. He's only 9 months old, so I figure that's a big recipe win! Warning: for little ones, it can be very messy! My son fed himself, so this was a "from high-chair to bathtub" meal. I don't think anything hit the floor though, so it has the Little C stamp of approval!
Tomato-Hamburger Macaroni
Ingredients: (This was a double batch, and made a LOT, probably around 10 servings)
1. Heat oil in a frying pan over medium heat, and add garlic and onions.
2. Put a pot of water on to boil. Once boiled, add pasta and cook according to instructions on box, until al dente - it will cook a little more when added to the other ingredients, and I think al dente is always good when freezing.
3. Once the onions start to cook, add mushrooms. I usually put a pot lid over the mushrooms until the water starts to come out of them and they start to steam a bit, and not just stick to the pan. Once mushrooms start to reduce, I take the lid off.
4. Add ground beef.
5. Add salt and pepper. (Note: Watch the total salt content of your recipe. If you have diced tomatoes that have added salt, I wouldn't add salt at this point. Remember there is also salt in the soup, so if don't overdo it!)
6. Cook beef mixture until no longer pink and beef starts to brown. Break up beef as it's cooking. Drain off any fat. (I had used extra lean, so there wasn't much.)
7. When beef/mushroom mixture is done, I usually put a little splash of chicken broth in the pan to help scrape off all the little tasty bits on the bottom of the pan. I think they add a lot of flavor, so I don't want to leave them behind.
8. In a large pot, add beef/mushroom mixture, diced tomatoes, soup, and cooked macaroni. Stir and heat through.
I served with a salad. If you want to be fancy, you could add a little grated cheese to the top. :)
You could also add additional veggies to this recipe. I think zucchini would be a good choice, especially if it was grated. (Need to hide the green from yourhusband kids? Just peel the zucchini before grating.) Next time, I think I'll try that, and I would also add even more mushrooms. They mix in so well with the beef to camouflage themselves.
This was really yummy, and very easy to freeze. It's an easy, quick meal.
As a bonus, this is probably my son's new favourite food. He's only 9 months old, so I figure that's a big recipe win! Warning: for little ones, it can be very messy! My son fed himself, so this was a "from high-chair to bathtub" meal. I don't think anything hit the floor though, so it has the Little C stamp of approval!
 |
| Not the best picture, but I was too busy eating to take pictures! |
Tomato-Hamburger Macaroni
Ingredients: (This was a double batch, and made a LOT, probably around 10 servings)
- ~1T oil
- ~1t of diced garlic
- 2 cups of finely chopped mushrooms - I used baby bellas
- a splash of low sodium chicken broth (although water would work)
- ~1/2 cup onion, chopped finely
- 300g ground beef
- salt & pepper
- 2 cans (28oz cans) of diced tomatoes (The brand I used wasn't watery, like some diced tomatoes can be. The liquid was thick and tomato-y. Since I planned to freeze it, I didn't want to worry about my final product being too dry, so I didn't drain. If I was using tomatoes with a lot of water, I would drain one can.)
- 2 cans of condensed tomato soup (you could probably use tomato sauce)
- 2 1/2 cups of macaroni - I used whole wheat
1. Heat oil in a frying pan over medium heat, and add garlic and onions.
2. Put a pot of water on to boil. Once boiled, add pasta and cook according to instructions on box, until al dente - it will cook a little more when added to the other ingredients, and I think al dente is always good when freezing.
3. Once the onions start to cook, add mushrooms. I usually put a pot lid over the mushrooms until the water starts to come out of them and they start to steam a bit, and not just stick to the pan. Once mushrooms start to reduce, I take the lid off.
4. Add ground beef.
5. Add salt and pepper. (Note: Watch the total salt content of your recipe. If you have diced tomatoes that have added salt, I wouldn't add salt at this point. Remember there is also salt in the soup, so if don't overdo it!)
6. Cook beef mixture until no longer pink and beef starts to brown. Break up beef as it's cooking. Drain off any fat. (I had used extra lean, so there wasn't much.)
7. When beef/mushroom mixture is done, I usually put a little splash of chicken broth in the pan to help scrape off all the little tasty bits on the bottom of the pan. I think they add a lot of flavor, so I don't want to leave them behind.
8. In a large pot, add beef/mushroom mixture, diced tomatoes, soup, and cooked macaroni. Stir and heat through.
I served with a salad. If you want to be fancy, you could add a little grated cheese to the top. :)
You could also add additional veggies to this recipe. I think zucchini would be a good choice, especially if it was grated. (Need to hide the green from your
This was really yummy, and very easy to freeze. It's an easy, quick meal.
Wednesday, 30 July 2014
"Blend & Extend" Taco Salad
A couple weeks ago, I found this website, http://www.blendandextend.ca/. It was created by the Beef Farmers of Ontario and Mushroom Canada. The idea behind it is adding mushrooms to your ground beef to stretch out the beef while adding veggies at the same time.
After meeting with a dietician, I realized how out of control the meat servings I've been eating have gotten. Did you know that one serving of meat is about 100g, raw. I guess a hunk of meat, like a steak or chop wouldn't be too bad at 100g, but ground beef is pretty small when you're looking at 100g. I thought that this was a great resource, so I tried it out this week.
One of our favourite meals is tacos. I often make my tacos into a taco salad. It's easy to over do it on taco shells or wraps and meat, so when I saw the recipe for a taco salad, I knew I should try it.
You can find the recipe here: http://www.blendandextend.ca/portfolio/taco-salad/
I had to make some changes to the recipe, because I didn't prepare nearly enough before getting groceries. Luckily, all worked out, but it could have been a complete kitchen disaster.

There was a lot of food on that plate. It doesn't look like it, but it was a big plate with a sky-high salad. Lots of green veggies. It was delicious and even got the husband stamp of approval. That's a tough one when lots of vegetables are involved.
This is definitely a make again meal. Hmmm, what other recipes can I blend and extend?
After meeting with a dietician, I realized how out of control the meat servings I've been eating have gotten. Did you know that one serving of meat is about 100g, raw. I guess a hunk of meat, like a steak or chop wouldn't be too bad at 100g, but ground beef is pretty small when you're looking at 100g. I thought that this was a great resource, so I tried it out this week.
One of our favourite meals is tacos. I often make my tacos into a taco salad. It's easy to over do it on taco shells or wraps and meat, so when I saw the recipe for a taco salad, I knew I should try it.
You can find the recipe here: http://www.blendandextend.ca/portfolio/taco-salad/
I had to make some changes to the recipe, because I didn't prepare nearly enough before getting groceries. Luckily, all worked out, but it could have been a complete kitchen disaster.
- I used Mini-Bella mushrooms, they worked great
- I didn't have a red pepper, so I omitted, but next time I'll make sure I have one (or a mix of green, red and orange)
- I didn't have Tex-Mex seasoning, but I did have a packet of taco seasoning, so I used that. I ended up needing a lot, so I think I'll try the actual seasoning next time.
- The recipe calls for one can of diced tomatoes. In my mind, a can is a 28oz can. Not right. This recipe requires a 14oz can. Sadly, I only realized it after I poured the entire can into the pan, so I had to carefully pick out half a can worth of tomatoes. I didn't quite get enough out, and hopefully I won't make that mistake again. Thank goodness I realized, because it would have been gross.
- I also didn't have an avocado. I usually do, but they weren't ripe at all this week, so I didn't buy any this week. I did, however have some all natural guacamole, so I used a little dollop of that.
- Also, no sour cream. (Seriously, what DID I buy for groceries???) Luckily, I use greek yogurt in exchange for sour cream all the time, so that's what I did.
- I also added spinach to the lettuce.
There was a lot of food on that plate. It doesn't look like it, but it was a big plate with a sky-high salad. Lots of green veggies. It was delicious and even got the husband stamp of approval. That's a tough one when lots of vegetables are involved.
This is definitely a make again meal. Hmmm, what other recipes can I blend and extend?
Monday, 28 July 2014
Double Chocolate Skor Cake
I successfully made my husband's birthday cake this weekend.
It's not the first time I've made his cake, but I think this is the first 100% made from scratch birthday cake, so I was pretty proud of it. It's also one of those skills that mums (or parents, in general) need, right? Homemade birthday cakes are so much more memorable!
To give you an idea of what I've done before, here are a couple of cakes from the past:
This was a "Star Wars" cake - made with chocolate cake (from a box) and boiled icing. As you can tell, it was a treat for the taste buds AND the eyes! (Can you tell I have zero experience decorating cakes? I do have a sense of humour though!)
 Another year, I just decided to make a simple chocolate cake with lots of boiled icing. (Also made from a boxed cake mix.)
Can you tell I like chocolate cake with boiled icing? I do. A lot. I especially like it when there is leftover icing... It's so good. (Let me know if you want the recipe for that icing - it's easy and soooo yummy!)
A few years ago, we bought his birthday cake from a local cupcake business, Saint John Cupcake Salon. Sadly, that business has since closed. The cake I got him was based on his favourite cupcake - "Toffee Time." It was a vanilla cupcake, topped with delicious chocolate buttercream and toffee bits. Since we miss that business so much, I thought I'd try to make my own version of the cake.
The Cake: The original cake was a three level vanilla cake, but I decided to do a one layer chocolate cake and a dozen cupcakes. I used my reliable cake recipe, found here. It makes a really chocolate-y moist cake, so I wasn't going to mess with perfection!
The Frosting: For the frosting, I used my own recipe. The recipe that goes with the cake on the above website never really worked for me. It was really good, but didn't spread the way I like, so I decided to make up my own recipe, based on what I usually use for vanilla buttercream. It turned out great, so I thought I'd share below:
 The Topping: I frosted the cake and cupcakes, and then poured toffee bits into a bowl. (I use Skor baking bits, but in the U.S., I think I've seen heath bits. Just look for some sort of toffee bits in the baking section, where the chocolate chips are.) It took about a package and a half for the cake and cupcakes. I sprinkled Skor bits on top of the cake and gently pressed them to make sure they would stick. On the sides, I put the toffee in my hand and pressed them into the sides. The cupcakes were much easier - just roll them in the bowl of Skor bits. If you eat the cake the same day, the bits are still crunchy. The next day, they get kind of "melty." Both are really yummy.

Chocolate Buttercream:
Note: I was able to frost a single layer cake, 12 cupcakes and still have about 1.5 cups leftover, so this would do a double (or maybe even a triple) layer cake.
Ingredients:
1 Cup butter (softened to room temperature, not melted)
1C + 2T cocoa (sift to remove lumps)
6 C icing sugar (sift to remove lumps)
1/2 C milk
2 t vanilla
(you could also add a little espresso powder or instant coffee to give it a hint of a mocha flavour like the cake)
Instructions:
1) Beat softened butter and cocoa together, with paddle attachment. (I assume a regular beater would work, too.)
2) Add 4 C icing sugar, one cup at a time, beating well in between
3) Add 1/4 C milk and vanilla and beat well
4) Add remaining sugar one cup at a time, beating well
6) Add remaining milk until frosting is desired consistency
7) Frost your cake and enjoy the sugar rush!
|
| Double Chocolate Skor cake and cupcakes |
To give you an idea of what I've done before, here are a couple of cakes from the past:
 |
| You've got the dark side vs. the good side (good side? light side? what is it Star Wars folks?) Yoda floated on his own cake. |
Another year, I just decided to make a simple chocolate cake with lots of boiled icing. (Also made from a boxed cake mix.)Can you tell I like chocolate cake with boiled icing? I do. A lot. I especially like it when there is leftover icing... It's so good. (Let me know if you want the recipe for that icing - it's easy and soooo yummy!)
A few years ago, we bought his birthday cake from a local cupcake business, Saint John Cupcake Salon. Sadly, that business has since closed. The cake I got him was based on his favourite cupcake - "Toffee Time." It was a vanilla cupcake, topped with delicious chocolate buttercream and toffee bits. Since we miss that business so much, I thought I'd try to make my own version of the cake.
The Cake: The original cake was a three level vanilla cake, but I decided to do a one layer chocolate cake and a dozen cupcakes. I used my reliable cake recipe, found here. It makes a really chocolate-y moist cake, so I wasn't going to mess with perfection!
The Frosting: For the frosting, I used my own recipe. The recipe that goes with the cake on the above website never really worked for me. It was really good, but didn't spread the way I like, so I decided to make up my own recipe, based on what I usually use for vanilla buttercream. It turned out great, so I thought I'd share below:
The Topping: I frosted the cake and cupcakes, and then poured toffee bits into a bowl. (I use Skor baking bits, but in the U.S., I think I've seen heath bits. Just look for some sort of toffee bits in the baking section, where the chocolate chips are.) It took about a package and a half for the cake and cupcakes. I sprinkled Skor bits on top of the cake and gently pressed them to make sure they would stick. On the sides, I put the toffee in my hand and pressed them into the sides. The cupcakes were much easier - just roll them in the bowl of Skor bits. If you eat the cake the same day, the bits are still crunchy. The next day, they get kind of "melty." Both are really yummy. Chocolate Buttercream:
Note: I was able to frost a single layer cake, 12 cupcakes and still have about 1.5 cups leftover, so this would do a double (or maybe even a triple) layer cake.
Ingredients:
1 Cup butter (softened to room temperature, not melted)
1C + 2T cocoa (sift to remove lumps)
6 C icing sugar (sift to remove lumps)
1/2 C milk
2 t vanilla
(you could also add a little espresso powder or instant coffee to give it a hint of a mocha flavour like the cake)
Instructions:
1) Beat softened butter and cocoa together, with paddle attachment. (I assume a regular beater would work, too.)
2) Add 4 C icing sugar, one cup at a time, beating well in between
3) Add 1/4 C milk and vanilla and beat well
4) Add remaining sugar one cup at a time, beating well
6) Add remaining milk until frosting is desired consistency
7) Frost your cake and enjoy the sugar rush!
Subscribe to:
Posts (Atom)
Blueberry Pie and A Beautiful Drive!
Yesterday, I went for a drive all by myself. I feel like this shouldn't be news, but usually I have C in tow, and although he makes road...

-
 I’m home from five days in Prince Edward Island. I never seem to tire of visiting the Island. The fields, coastline, water, winding roads, a...
-
 Yesterday, I went for a drive all by myself. I feel like this shouldn't be news, but usually I have C in tow, and although he makes road...